
By default there is a setup may or may not enabled gitlab registry in Gitlab Omnibus. In this Post you will learn how to enable it and integrate with Minio S3 bucket. In this Part1 we will install and configure Minio server.
Pre-requisites
For this setup we need:
- Gitlab Omnibus Server (ce, ee)
- Ubuntu 20.04 Server (minimum 4gb ram, 4 cpu, and 250 gb storage)
- Docker server to test Gitlab container registry
- Openssl or Letsencrypt for secure connection
Minio installation
You can install the Minio server by compiling the source code or via a binary file. To install it from the source, you need to have at least Go 1.12 installed on your system. First, log in to your server, replacing efe with your username and your_server_ip with your Ubuntu 20.04 server’s IP address:
1ssh efe@your_server_ip
Then you have to update package database:
1sudo apt update
Next, download the Minio server’s binary file from the official website:
1wget https://dl.min.io/server/minio/release/linux-amd64/minio
The output will be similar:
 1Output
 2--2020-07-31 15:08:49--  https://dl.min.io/server/minio/release/linux-amd64/minio
 3Resolving dl.min.io (dl.min.io)... 178.128.69.202
 4Connecting to dl.min.io (dl.min.io)|178.128.69.202|:443... connected.
 5HTTP request sent, awaiting response... 200 OK
 6Length: 44511616 (42M) [application/octet-stream]
 7Saving to: ‘minio’
 8
 9minio               100%[===================>]  42.45M  21.9MB/s    in 1.9s
10
112020-07-31 15:08:51 (21.9 MB/s) - ‘minio’ saved [44511616/44511616]
When the download is finished, a file named minio will be in your working directory. By the following command to make it executable:
1sudo chmod +x minio
Next move the file into the /usr/local/bin directory that Minio’s systemd startup script expects to find it:
1sudo mv minio /usr/local/bin
For security reason it is the best practice to avoid Minio server running as root. So we need to create minio user and group.
1sudo useradd -r minio-user -s /sbin/nologin
Next, change ownership of the Minio binary to minio-user:
1sudo chown minio-user:minio-user /usr/local/bin/minio
Next, we need to create a directory where Minio will store files.
1sudo mkdir /usr/local/share/minio
Now we need to give ownership of minio-user to this directory:
1sudo chown minio-user:minio-user /usr/local/share/minio
Now we need to create directory inside /etc in order to store Minio configuration file:
1sudo mkdir /etc/minio
And then again give ownership of mini-user too:
1sudo chown minio-user:minio-user /etc/minio
Now we need to add and modify minio default configuration file:
1vim /etc/default/minio
Once the file is open, add in the following lines to set some important environment variables:
1MINIO_ACCESS_KEY="minio"
2MINIO_VOLUMES="/usr/local/share/minio/"
3MINIO_OPTS="-C /etc/minio --address your_server_ip:9000"
4MINIO_SECRET_KEY="miniostorage"
You need to change the variables with your own.
Now it is the time to install Minio Systemd Startup Script:
1curl -O https://raw.githubusercontent.com/minio/minio-service/master/linux-systemd/minio.service
The output will be similar to the following:
1Output
2
3  % Total    % Received % Xferd  Average Speed   Time    Time     Time  Current
4                                 Dload  Upload   Total   Spent    Left  Speed
5100   835  100   835    0     0   6139      0 --:--:-- --:--:-- --:--:--  6139
In order to audit the contents of minio.service before applying it, open it in a text editor:
1vim minio.service
It will show the following:
 1[Unit]
 2Description=MinIO
 3Documentation=https://docs.min.io
 4Wants=network-online.target
 5After=network-online.target
 6AssertFileIsExecutable=/usr/local/bin/minio
 7
 8[Service]
 9WorkingDirectory=/usr/local/
10
11User=minio-user
12Group=minio-user
13
14EnvironmentFile=/etc/default/minio
15ExecStartPre=/bin/bash -c "if [ -z \"${MINIO_VOLUMES}\" ]; then echo \"Variable MINIO_VOLUMES not set in /etc/default/minio\"; exit 1; fi"
16
17ExecStart=/usr/local/bin/minio server $MINIO_OPTS $MINIO_VOLUMES
18
19# Let systemd restart this service always
20Restart=always
21
22# Specifies the maximum file descriptor number that can be opened by this process
23LimitNOFILE=65536
24
25# Disable timeout logic and wait until process is stopped
26TimeoutStopSec=infinity
27SendSIGKILL=no
28
29[Install]
30WantedBy=multi-user.target
31
32# Built for ${project.name}-${project.version} (${project.name})
Then we need to change unit files directories. Systemd requires that unit files be stored in the systemd configuration directory:
1sudo mv minio.service /etc/systemd/system
Then, we need to run the following commands to reload all systemd units and enable Minio to start on boot and start Minio:
1sudo systemctl daemon-reload
2sudo systemctl enable minio
3sudo systemctl start minio
I will use default 9000 port on Minio server. So for that we need to enable access configured port through firewall:
1sudo ufw allow 9000
2sudo ufw enable
You will get the following prompt:
1Output
2Command may disrupt existing ssh connections. Proceed with operation (y|n)?
Press y and ENTER to confirm this. Output should be like following:
1Output
2Firewall is active and enabled on system startup
Now our Minio server is ready to accept traffic but in order to make it secure, we need another step to configure Let’s Encrypt(it is free to use) ssl to our Minio server:
First, allow HTTP and HTTPS access through firewall.
1sudo ufw allow 80
2sudo ufw allow 443
Once all done we can check status:
1sudo ufw status verbose
Output should be like that:
 1Output
 2Status: active
 3Logging: on (low)
 4Default: deny (incoming), allow (outgoing), disabled (routed)
 5New profiles: skip
 6
 7To                         Action      From
 8--                         ------      ----
 922/tcp (OpenSSH)           ALLOW IN    Anywhere
109000                       ALLOW IN    Anywhere
11443                        ALLOW IN    Anywhere
1280                         ALLOW IN    Anywhere
1322/tcp (OpenSSH (v6))      ALLOW IN    Anywhere (v6)
149000 (v6)                  ALLOW IN    Anywhere (v6)
15443 (v6)                   ALLOW IN    Anywhere (v6)
1680 (v6)                    ALLOW IN    Anywhere (v6)
Next we will install Certbot. Before generating free wildcard certificates, we need first to make sure certbot is installed and running… To install it, run the commands below:
1sudo apt update
2sudo apt-get install letsencrypt
Now we can obtain certificate:
1sudo certbot certonly --standalone -d minio-server.your_domain
Output should be like that:
1Output
2Saving debug log to /var/log/letsencrypt/letsencrypt.log
3Plugins selected: Authenticator standalone, Installer None
4Enter email address (used for urgent renewal and security notices) (Enter 'c' to
5cancel):
Add your email and press ENTER.
Will then ask you to register with Let’s Encrypt:
1Output
2- - - - - - - - - - - - - - - - - - - - - - - - - - - - - - - - - - - - - - - -
3Please read the Terms of Service at
4https://letsencrypt.org/documents/LE-SA-v1.2-November-15-2017.pdf. You must
5agree in order to register with the ACME server at
6https://acme-v02.api.letsencrypt.org/directory
7- - - - - - - - - - - - - - - - - - - - - - - - - - - - - - - - - - - - - - - -
8(A)gree/(C)ancel:
Type A and press ENTER to agree.
Next you will see this output:
1Output
2- - - - - - - - - - - - - - - - - - - - - - - - - - - - - - - - - - - - - - - -
3Would you be willing to share your email address with the Electronic Frontier
4Foundation, a founding partner of the Let's Encrypt project and the non-profit
5organization that develops Certbot? We'd like to send you email about our work
6encrypting the web, EFF news, campaigns, and ways to support digital freedom.
7- - - - - - - - - - - - - - - - - - - - - - - - - - - - - - - - - - - - - - - -
8(Y)es/(N)o:
You can answer it yourself both Y or N, then your public and private keys will be generated and saved in the /etc/letsencrypt/live/minio-server.your_domain_name directory.
Next, we need to copy two files (privkey.pem and fullchain.pem) into the certs directory under Minio’s server configuration folder and rename it to private.key:
1sudo cp /etc/letsencrypt/live/minio-server.your_domain_name/privkey.pem /etc/minio/certs/private.key
Then do the same for fullchain.pem, naming rename public.crt:
1sudo cp /etc/letsencrypt/live/minio-server.your_domain_name/fullchain.pem /etc/minio/certs/public.crt
Now we need to change ownership of private.key and public.crt to mini-user:
1sudo chown minio-user:minio-user /etc/minio/certs/private.key
2sudo chown minio-user:minio-user /etc/minio/certs/public.crt
Before connect Minio server Web interface, we need to restart it:
1sudo systemctl restart minio
At last we can Access the web interface by pointing to https://minio-server.your_domain:9000.
You will see login screen like that:
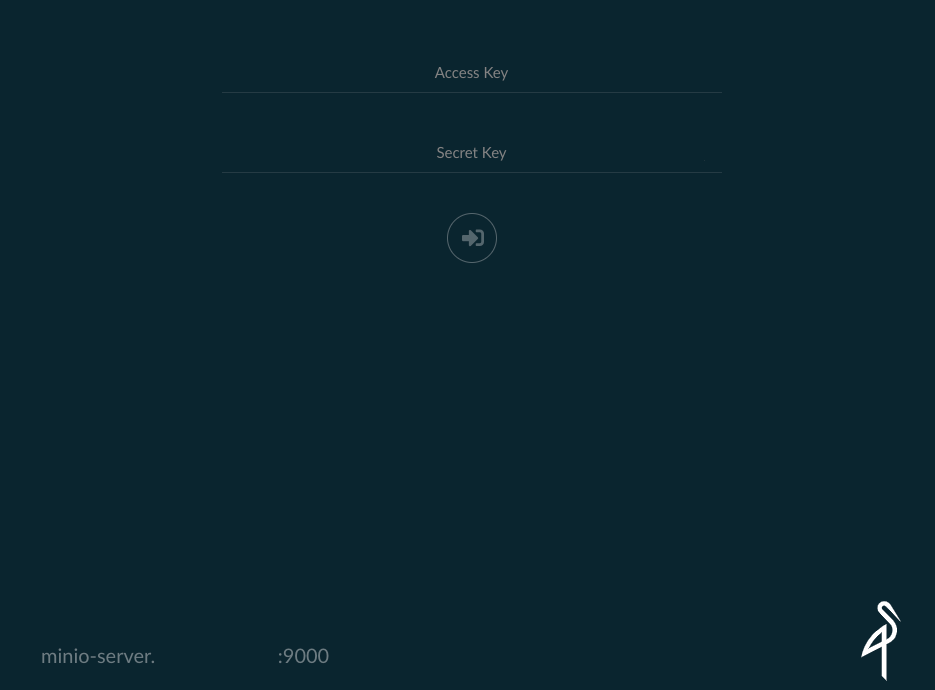
Now, log in to the main interface by entering credentials.(MINIO_ACCESS_KEY, MINIO_SECRET_KEY)
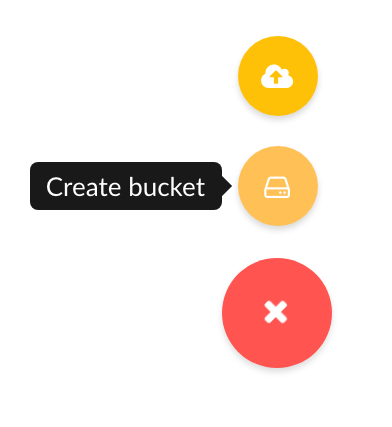
Then you can create bucket through:
That is it for now… Follow for next Part2. I will share how to connect Gitlab container registry to Minio bucket.